Ultrasonic Corrosion Monitoring – It's Time for a Paradigm Shift
Part 1: A Holistic Approach
Corrosion monitoring using ultrasonic sensors is a well-known method to determine remaining material thickness and, therefore, the on-going integrity of pipelines, pipes, vessels, and tanks. By using such methods, leaks and their consequences such as environmental damage, direct and collateral equipment damage, and process interruptions or slowdowns can be prevented.
Corrosion monitoring relies predominantly on manual ultrasonic inspections. Inspectors collect thickness measurements with portable ultrasonic equipment at predetermined measurement locations – the so-called condition monitoring locations (CMLs), formerly referred to as thickness monitoring locations (TMLs).
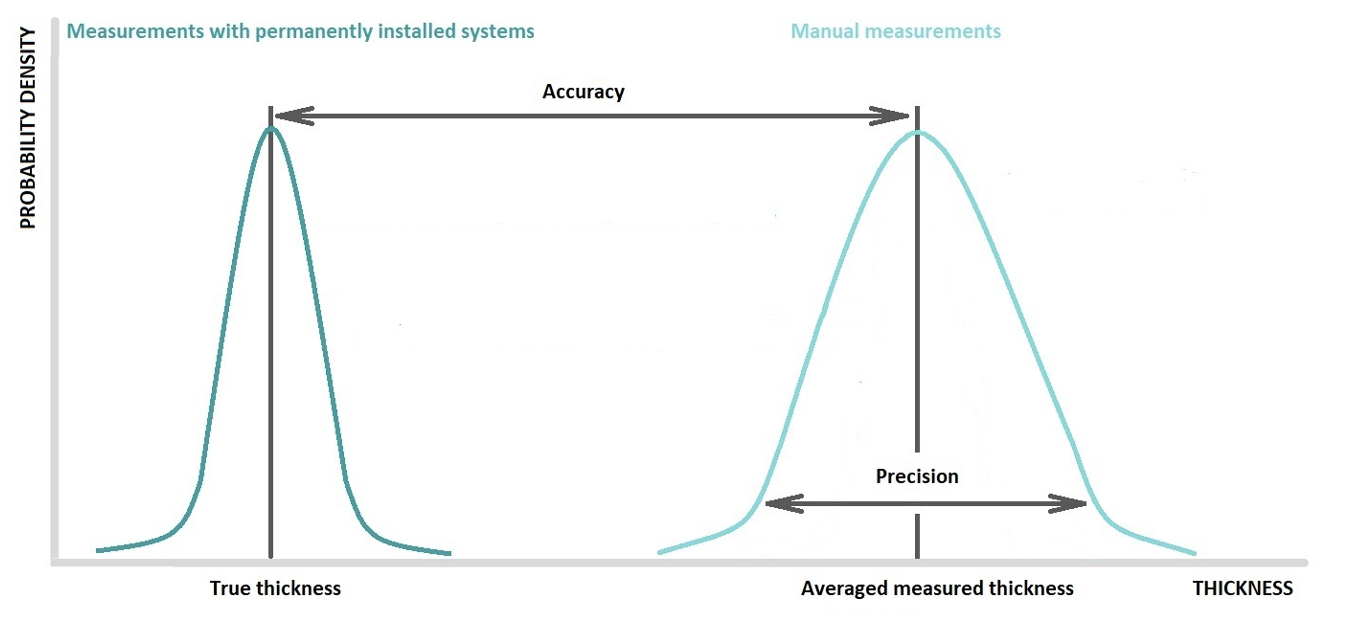
Manual thickness measurements tend to be limited in accuracy (deviation from true thickness value) and precision (variation around an average thickness value). These limitations may impact the subsequent analysis and calculated corrosion rates related to the planned retirement or maintenance of an asset. In particular, the limitations of manual thickness measurements when addressing general corrosion usually result in over-monitoring (e.g., too many CMLs, too frequent inspections), uncertainties, and the tendency to force asset owners and corrosion engineers to trade risk against the life cycle cost of a component as we will explain in more detail in one of the next paragraphs.
Temporarily or permanently installed thickness monitoring equipment could help to overcome these technical shortcomings and uncertainties and could lead to significantly improved maintenance and asset replacement forecasting. However, the high cost of those systems usually prevents the mass deployment of permanently installed systems. As a result, the industry is forced to continue with the old-fashioned, inaccurate, and imprecise inspection methodology with unnecessarily high safety margins, a lot of uncertainties, and unnecessarily high costs.
Fortunately, the emergence of the Industrial Internet of Things (IIoT) and NDE 4.0 are paving the way for a paradigm shift![1]
When looking at the risk of CMLs as part of a classical inspection plan or an RBI program, it is difficult to distinguish between a majority of low-risk CMLs and a small fraction of high-risk CMLs. Applying one-size fits all hardware-centric solutions has proven to be inadequate and expensive. Instead, the difference in risk and consequently in inspection activities (number of CMLs and number of inspections) requires adaptive hardware and analytics solutions to reduce uncertainties associated with risk and cost while increasing safety in the plants.
Let’s start by evaluating the situation for low risk CMLs. In general, low risk CMLs should only be inspected every 5 or 10 years and the number of CMLs should be very small. In fact, in the case of general corrosion, a circuit would theoretically require only one CML. However, due to the technical limitations in accuracy and precision, low-risk circuits are usually equipped with an unnecessarily high number of CMLs. Additionally, the low confidence in the inspection results requires extra inspections in addition to the scheduled inspection. This high inspection activity spanning high number of CMLs and high number of inspections results in unnecessarily high inspection costs. Additionally, there are costs associated with the evaluation of the quality of the thickness measurements by asset owners, corrosion engineers, and fixed equipment teams.
Modern analytics tools can help to optimize the inspection activity by reducing waste and costs while not increasing the risk level. This relation is shown in Figure 1.

Before moving ahead with solutions for high-risk CMLs, it is important to remind ourselves that ultrasonic thickness measurements are based on measuring the time-of-flight (ToF) of an ultrasonic pulse in the material to be inspected. Multiplication with the temperature-dependent material velocity v(T) and division by two provides the actual thickness tActual of the material at the location of the measurements:

The quality of manual measurements is determined by two factors, called precision and accuracy.
The first limiting factor of precision describes the inherent nature of manual measurements and the subjectivity. In this case it describes the variation of thickness measurement values due to factors such as the influence of different inspectors, their practices and techniques, slight variations in the measurement location, slightly different instrumentation, and others. Therefore, one usually determines an average thickness reading for further analysis. When calculating an average value, it also requires the calculation of the variation or the standard deviation. Therefore, a correct thickness reading would imply several thickness measurements and its standard deviation, as for example 0.32 ± 0.03 inch. Permanently installed ultrasonic systems improve the precision of thickness measurements tremendously as the factors which influence thickness measurements negatively have been eliminated. While manual inspection thickness measurements have a standard deviation of around 0.03 inch (0.762 mm), permanently installed systems usually improve the precision to 0.001 inch (0.0254 mm). This is an improvement of around 97%.
The second limiting factor of accuracy describes the deviation of the average thickness value from the true thickness value. This deviation could be the result of incorrect time-of-flight measurements ToF or due to the use of incorrect temperature dependent material velocities v(T). While time-of-flight measurements are highly accurate with resolutions in the nanosecond range, it is still common practice to use reference literature values for the material velocities, which may differ significantly from the actual material velocities of the fixed equipment in the field.
Improving the accuracy of a thickness measurement therefore requires determining the actual material velocity. This can be achieved by measuring the actual material velocity at the time of the thickness measurement or by measuring the material velocity once and by using a temperature correction coefficient to compensate the change of material velocity with temperature. For the latter, literature provides a typical value of 1% per 55°C (see for example ASME BPVC Section V, Article 23, SE797/SE-797M). Temperature coefficients determined based upon actual measurements in the field can differ significantly from the literature value. The values range from 0.4% to 1.2%, depending on the material composition, material age, and the number and amplitudes of the experienced temperature cycles.

Sophisticated permanently installed ultrasonic monitoring systems lead to precise and accurate thickness measurements for high risk CMLs. The accuracy is important if one considers how the thickness measurements are used by inspectors and fixed equipment owners to plan repairs or replacement of assets.
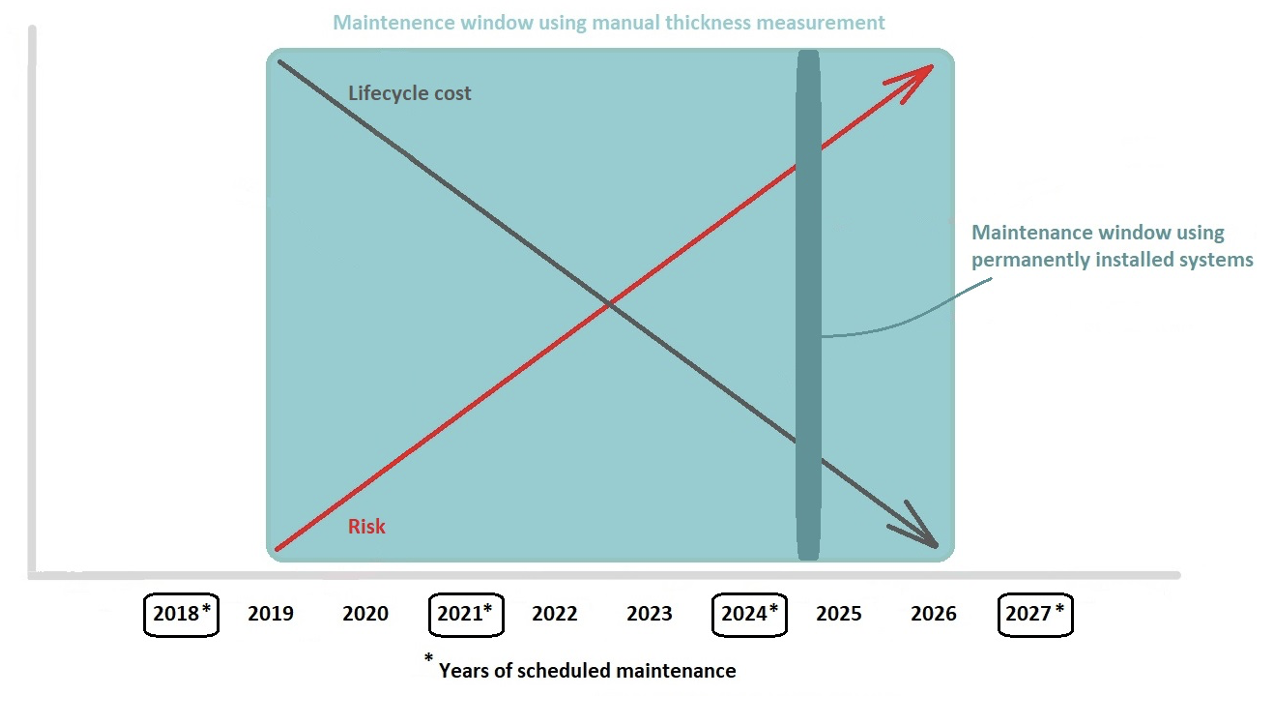
Thickness measurements are used to calculate short-term and long-term corrosion rates (see for example API 570). The long-term corrosion rate is then used to determine the remaining life, respectively the retirement date of the equipment based on information such as the corrosion allowance and the minimum allowable thickness. Uncertainties in the thickness measurements propagate through the calculations for corrosion rates and therefore retirement dates. The Gaussian error propagation law can be used to determine the uncertainties for corrosion rate and retirement date based on the uncertainty of the thickness measurements. Using typical field values from manual inspections, one will see that maintenance dates come with uncertainties to the tune of plus or minus a few years (Figure 3). Repair work or replacement at the beginning of the maintenance window will lead to higher than necessary lifecycle costs, whereas scheduling repairs for later times in the maintenance window increases risk of a leak. In the example shown in Figure 3, the dilemma is whether to repair or replace in either 2021 or 2023. The decision depends mainly on the experience of the inspector or asset owner and is therefore more of an art than a science leading to a data-driven decision. Using sophisticated permanently installed systems improves the situation significantly as they reduce the maintenance window to more a precise, data-driven window. Those smaller maintenance windows lead to an unambiguous data-driven decision to repair or replace in 2024.

A holistic approach using permanently installed sensor systems and analytics tools enables a shift from experience-based decision-as-an-art to data-driven decision-as-a-science. It also improves safety as it reduces the amount and frequency of inspectors in hazardous areas.
The shift to optimize corrosion monitoring with sensors and software leads to further opportunities. The evolution of models with machine learning and artificial intelligence can further refine corrosion monitoring without compromising safety. Stay tuned for future updates!
1 Singh defines NDE 4.0 as a cyber-physical NDE system – a confluence of Industry 4.0 technologies with traditional NDE methods. Cyber-physical NDE systems are based on the four design principles of interoperability, information transparency, technical assistance and decentralized decisions.
References
- Singh R. “The Next Revolution in Nondestructive Testing and Evaluation: What and How?", Materials Evaluation. 2019; 77(1): 45-60